Wednesday, January 6, 2010

Table 9.11 Complete

Upon completion and prior to delivery to the client, I had some pictures taken by a photographer. The great thing about the piece is while the workmanship and finish are close to perfect, the wood is nowhere close, and intentionally. This wood was reclaimed from an old barn and was attacked by the weather, sun, and termites over the years. So rightfully the wood shows the wear and tear of years of use. 2nd chances are great, not always deserved, but when given the opportunity, can yield beautiful results. Enjoy the picks.


The dark streaks in the wood are cracks left behind from years of exposure to the weather and sun.


Leg to top reinforcing peg.


Top to leg connection, simple yet elegant. The same is said the the keyed miter shown below.


Visible termite damage intentionally left in one of the legs. The dark spot in the lower right portion of the picture is a nail hole.


Tuesday, December 1, 2009

Table 9.11 Continued

Now that I have the base assembly glued up and rough sanded. I now have to reinforce the joints with wood keys. The pictures below show the steps from cuts to glue-up.

I built this jig which allows me to cut the grooves for the keys with my table saw. A quick note- take your time when building jigs to ensure their accuracy. Any inaccuracy in the jig will transfer to the piece being cut, which will cause headaches down the road.

Pictured both above and below are the finished groves which have been cut to receive the keys.


The keys have now been glued and have dried. Next I'll cut the excess key off with a fine hand saw then hand plane the key flush with the face of the base assembly. The finished product can be seen below.


Stay tuned... next I'll glue the legs to the base assembly.

Monday, November 30, 2009

table 9.11


I've been commissioned to build a table for a client. The white oak stock I'm using was reclaimed from an old barn. The wood is very old (truly old growth) so the grain is beautiful. The pictures to follow show the growth of the table.

The rough stock has to first be cleaned. A wire brush reveals the amount of dirt which has built up over the years. Dirt which if not removed would destroy the knives and blades of my equipment.

The oak to the left has rough planed and jointed squaring one edge. The first step in smoothing rough stock.


I had enough stock to make two tables, so I am gluing the 2nd table up first to troubleshoot any issues before I make the mistake on the commissioned piece. This is a table top in clamps.


The second top and prettier top for that matter after glue-up.

This is the top which will be used for the clients table. Note the dark streaks which were caused by years of weather. For scale, the marking knife in the picture is six inches.


This is the leg assembly during glue-up, the corner joints will be spline reinforced miters. As you can see, several clamps must be used to have a successful product. I glue on a piece of surfaced granite, this ensures the product is perfectly flat creating a piece which will not wobble once placed in service.

A close up of one of the mitered corners. The white foam is from the polyurethane glue I use.

The clients base assembly waiting for glue-up. Stay tuned for the completed project.

Casework


This is an entertainment center I built for my home. We removed one closet and borrowed a little space from another to set the casework into the wall. We gained about thirty inches of floor space across this wall by moving the TV, speakers and A/V components into the wall. The white fabric at the top is speaker fabric which conceals my front and center channel speakers. I think it worked out quite well.

Wednesday, August 19, 2009

Side Table.2

I promised earlier I'd post more pictures of my side table I built several years ago. As mentioned, the table is built from solid cherry, hence the weight, with brazilian cherry reinforcing pins (the small squares you'll notice around the table). I like to say this table has a quiet design, if you look carefully, it will reveil its details and proportions.


Side Detail


I'm a true believer in solid, true craftsmanship. There are several joinery methods used in this piece giving it its rock solid feel. The leg assembly or framework of the table is all pinned mortise and tenon, which were all hand cut. I used pinned half-lap joints to create the doors, through dovetails for the carcass, which is you look closely at the previous picture you can see through the leg assembly. The top is attached by three sliding dovetails, this particular joint is used to enable the movement of boards when attached cross grain to each other. This is a joint not often used because its difficult and time-consuming to create.

Friday, August 14, 2009

Hawthorne Hill Logs

I recently had the opportunity to capitalize on a cherry tree which was cut due to storm damage and it had the potential of falling on the home it stood next to. As you can see in the pictures to follow, the tree was cut and we were able to harvest 5 logs from the tree.

The cutters who were hired to fell the tree, cut as needed to safely drop it so no mind was given to cutting the tree in lengths which would yield the most usable amount of lumber. Luckily for the owner and myself...I really didn't care. Being a woodworker, I'll take any opportunity I have to keep a beautiful cherry tree from becoming firewood. As you'll see from the pictures, we still got good length from the tree, four logs were between 6-7', with the butt log being over 12', all diameters being between 24"-32".


The logs moved to the staging area ready for the mill.

This is the start of the process, rolling the log up to and onto the bed of the mill. What you don't see in this picture is the cable which assists rolling the log up the legs and onto the bed. Below is the first pass of the band mill. By process, we made several passes with the mill then turned the log 90 degrees, then again and again until we ended up with a square log called a cant. Follow process by pictures below.


Once we get to the square log, we start making passes to what ever thickness we cut from the cant. We cut anything from 4/4 (1" thick) to 16/4 (4" thick), with a healthy mix of everything in between.

I deem this log Bertha... enough said.


Squaring Bertha, as you can see in this photo, the mill is quite large. This particular model can cut a 21' log 30" in diameter. We calculated a yield of 300 board feet from this one log, not so bad!


My brother and I are carrying a piece cut to be used as a mantle. The client, Nancy (which is in the picture wearing the green shirt) was on site and super excited to see the process of her mantle being cut.


The finished product! Not bad for a days work. I want to give a special thanks to Leo (pictured) and Linda, who allowed me the opportunity to have this beautiful set of logs milled. The trailer was fully loaded, and what you don't see is the bed of the truck is nearly full as well.


Thursday, May 7, 2009

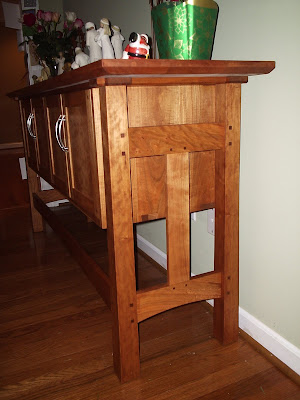
Side Table


This is a side table which I built for our house. The table is cherry and is finished with a custom mixed hand rubbed oil. The design is one which I pulled elements from several design styles from Craftsman to Asian, folded them together and ended up with this piece.